Inside a Bee Smoker: How It Works — A Visual Breakdown
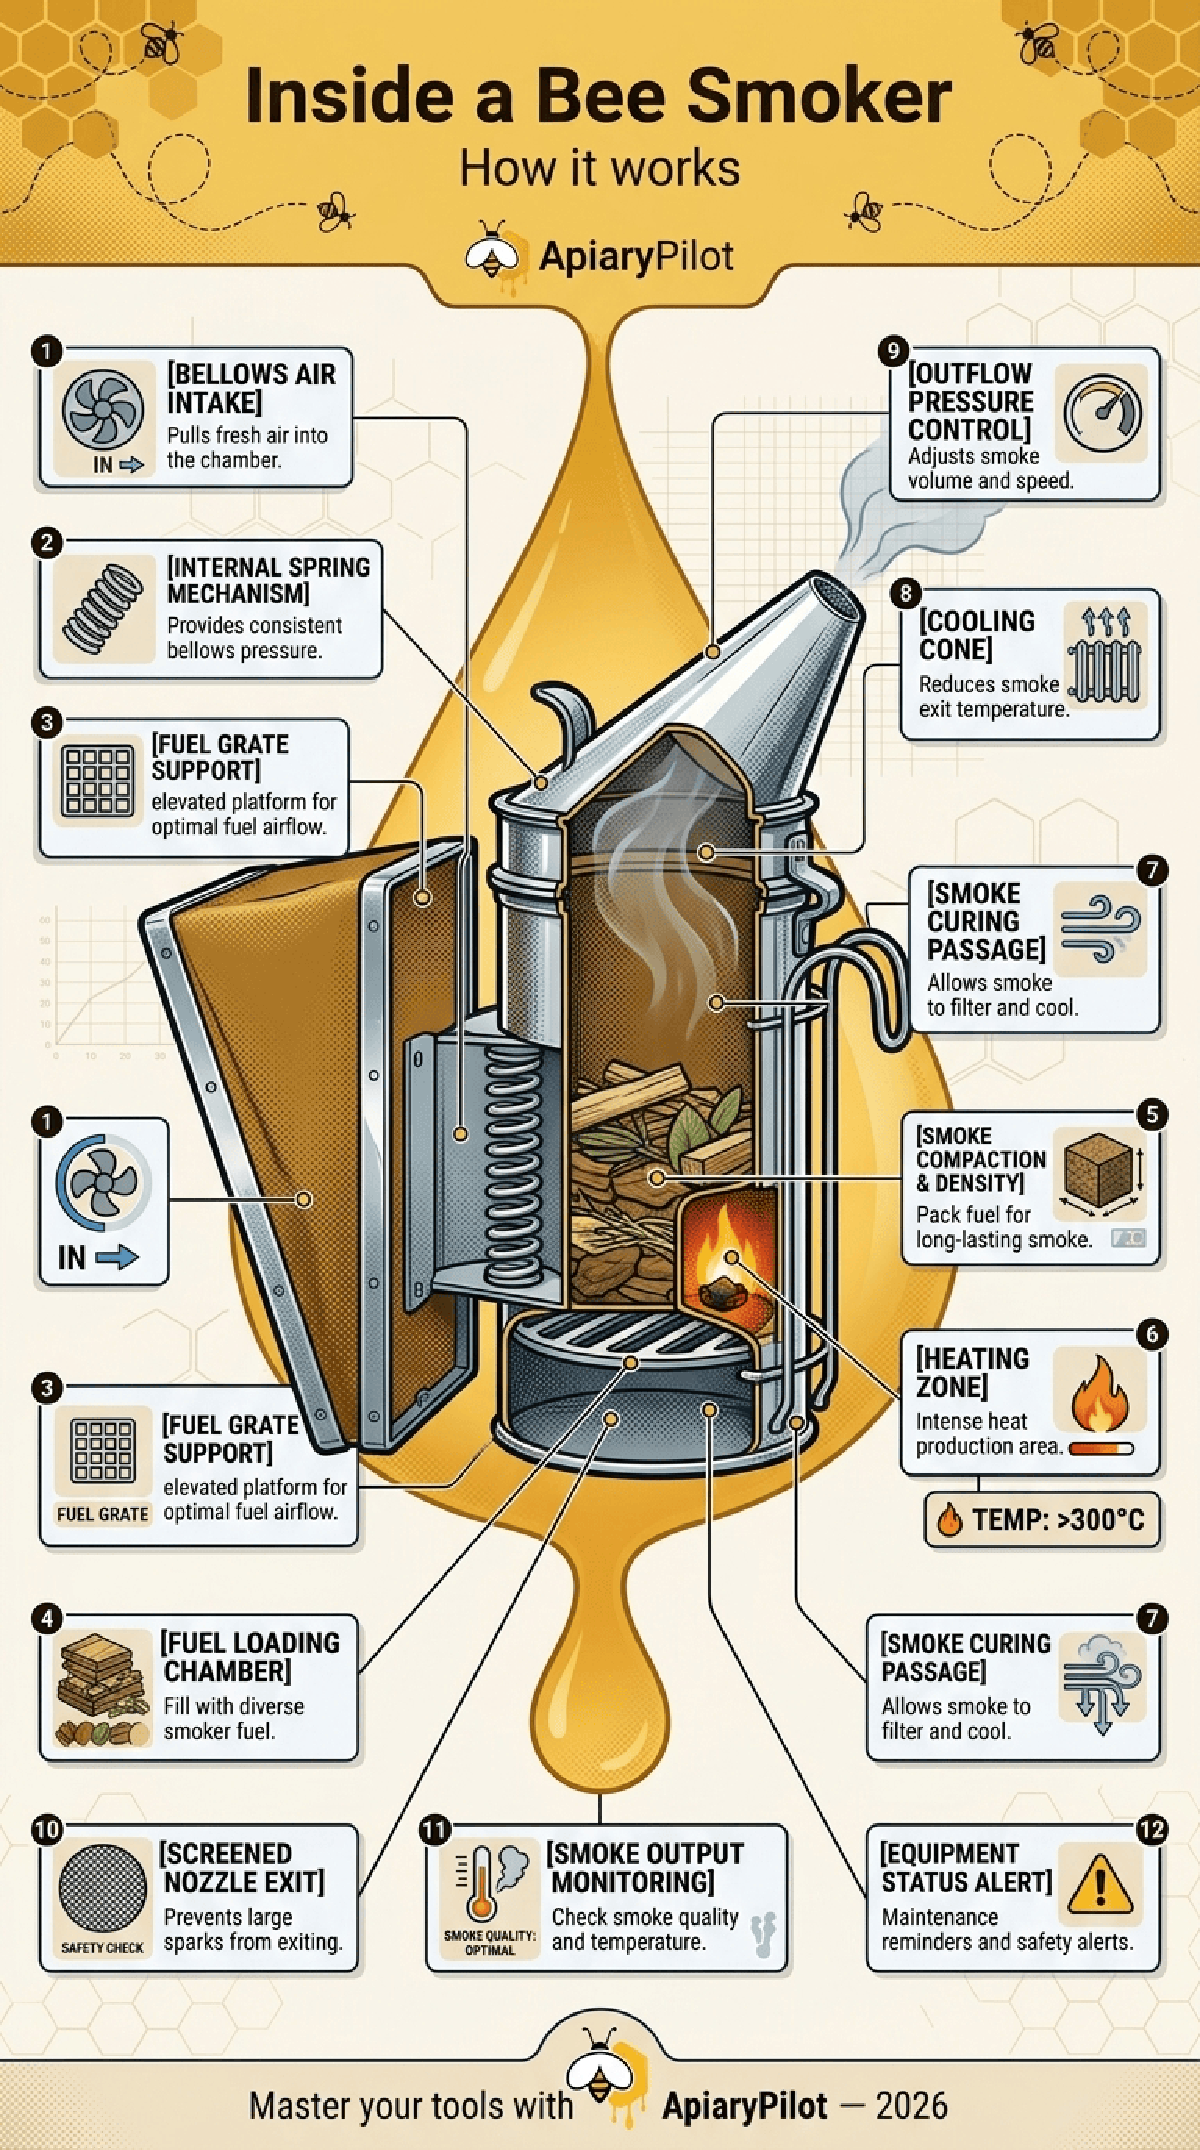
Ever wondered what happens inside your bee smoker? This detailed infographic reveals the 12 key components that turn fuel into cool, calming smoke.
About this inside a bee smoker: how it works — a visual breakdown infographic
This beekeeping infographic turns the key decisions behind inside a bee smoker: how it works — a visual breakdown into a visual reference that can be used during inspections, planning sessions, or training conversations. It is designed for practical apiary management, so each section highlights the observations, timing, and records that matter most in the field.
Use it as a quick reminder before opening colonies, preparing seasonal work, or reviewing hive notes with another beekeeper. For stronger records, keep the infographic beside your inspection journal and capture the matching hive data in ApiaryPilot, including dates, colony status, treatments, harvest actions, and follow-up tasks.
The download below is suitable for printing or sharing with a local beekeeping group. The embed code lets clubs, educators, and suppliers reference the infographic while linking back to the original ApiaryPilot guide page.
The bee smoker is one of the oldest and most essential tools in beekeeping. While its design has remained largely unchanged for over a century, the engineering behind it is surprisingly sophisticated. Understanding how each component works helps you produce better smoke, maintain your equipment, and keep your bees calm during inspections.

How Smoke Calms Bees
Before diving into the mechanics, it's worth understanding why we use smoke. When bees detect smoke, two things happen:
- Alarm response masking — smoke interferes with the pheromone signals bees use to communicate alarm, reducing defensive behavior
- Feeding response — bees begin consuming honey in preparation for a possible hive evacuation, which makes them less aggressive and easier to work with
The key is producing cool, white smoke — not hot, acrid smoke that irritates bees rather than calming them.
The Air Intake System
1. Bellows Air Intake
The bellows are the engine of your smoker. Each squeeze pushes fresh air into the combustion chamber, feeding the fire with oxygen. The volume and speed of air delivery directly controls smoke output.
2. Internal Spring Mechanism
Inside the bellows, a spring provides consistent return pressure. This ensures the bellows re-expand fully between squeezes, maximizing air intake. A weak spring means less air per pump and thinner smoke.
The Combustion Chamber
3. Fuel Grate Support
An elevated platform inside the fire chamber keeps fuel above the base, allowing air to circulate underneath. This is critical — fuel sitting directly on the bottom smothers and produces poor smoke.
4. Fuel Loading Chamber
The main body of the smoker where you load your fuel. The key to good smoke is proper fuel packing:
- Too loose — burns too fast, runs out quickly
- Too tight — restricts airflow, hard to keep lit
- Just right — firm but not compressed, with space for air circulation
Best fuel options:
- Pine needles — easy to light, good starter fuel
- Dried herbs (lavender, rosemary) — pleasant-smelling smoke
- Burlap or cotton — long-lasting, consistent burn
- Wood shavings — readily available, good smoke production
- Dried leaves — natural and free, moderate burn time
5. Smoke Compaction & Density
How you pack your fuel determines smoke quality. Tightly packed fuel produces denser, longer-lasting smoke. The goal is to create a smoldering burn that generates maximum smoke with minimal flame.
6. Heating Zone
The bottom of the fuel column reaches temperatures exceeding 300°C. This intense heat zone is where active combustion occurs, generating the energy that drives the smoldering process above it.
The Cooling System
7. Smoke Curing Passage
As hot smoke rises through the packed fuel above the heating zone, it cools and filters. This passage is what transforms harsh, hot combustion gases into the cool, white smoke that's gentle on bees.
8. Cooling Cone
The metal cone at the top of the smoker serves as a final cooling stage. It narrows the smoke path, slowing its exit and allowing additional heat dissipation before the smoke reaches your bees.
Output & Safety
9. Outflow Pressure Control
The nozzle shape and bellows pressure together determine how much smoke you deliver with each puff. Short, gentle squeezes produce light wafts; firm pumps create dense clouds for more defensive colonies.
10. Screened Nozzle Exit
A screen or guard at the smoker's nozzle prevents burning embers and sparks from exiting. This is a critical safety feature — hot embers landing on dry grass or wooden equipment can cause fires.
11. Smoke Output Monitoring
Experienced beekeepers learn to read their smoke:
- White, cool smoke — ideal, fuel is smoldering properly
- Thin, wispy smoke — needs more fuel or a few bellows pumps
- Dark, hot smoke — too much flame, add more fuel on top to smother
- No smoke — fire has gone out, relight with fresh starter fuel
12. Equipment Status Alert
Regular maintenance keeps your smoker reliable:
- Clean ash buildup from the fire chamber regularly
- Check bellows for holes or cracks
- Ensure the spring mechanism returns fully
- Inspect the nozzle screen for blockages
- Store with the lid closed to prevent rust
Lighting Your Smoker: Step by Step
- Start with a small amount of easy-to-light material (newspaper, pine needles)
- Light it and pump the bellows until flames are established
- Gradually add your main fuel, pumping between additions
- Pack the fuel firmly once the fire is going
- Continue pumping until dense white smoke flows freely
- Top up with a final layer of green grass or damp material for extra cooling
Safety Tips
- Never leave a lit smoker unattended on dry ground
- Extinguish properly by plugging the nozzle with green grass and closing the lid
- Check for embers before storing
- Keep water nearby during dry conditions
- Use a smoker stand to prevent tipping
Log Your Equipment with ApiaryPilot
ApiaryPilot helps you track equipment maintenance schedules, log fuel preferences that work best for your bees, and set reminders for smoker cleaning. Keep your most essential tools in peak condition all season long.
Ready to elevate your beekeeping?
Start tracking your hives, inspections, and harvests with ApiaryPilot — the modern hive management platform built for beekeepers like you.
Get started free