Infographic · · 5 min read
Preventing Swarms: Make the Right Decisions Early
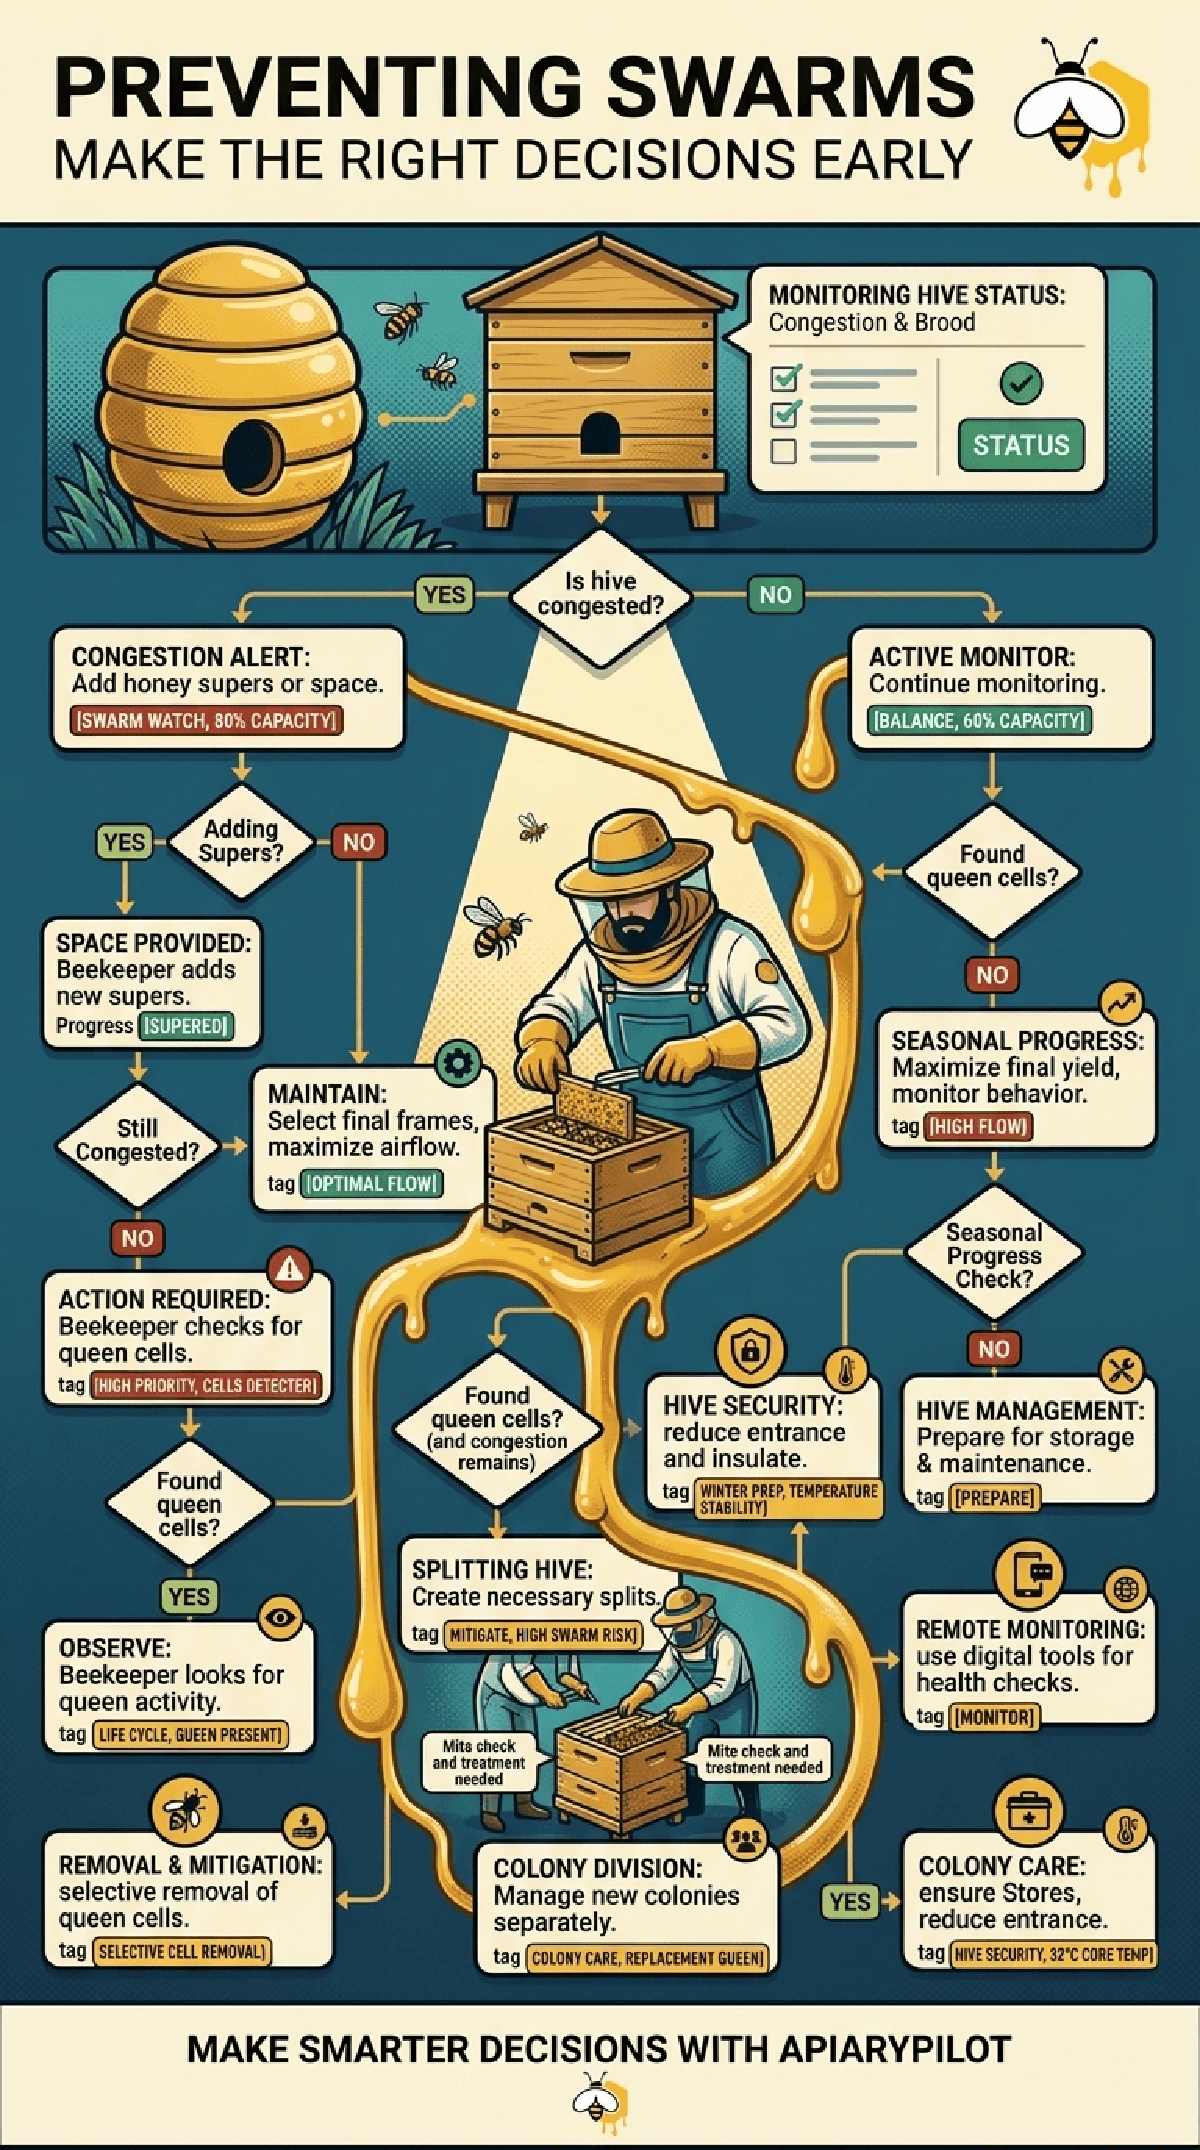
A visual decision tree for early swarm prevention — monitor congestion and brood, add space at the right moment, and act on queen cells before the colony leaves.
Swarming is the colony's natural way of reproducing — but for the beekeeper, an unmanaged swarm means lost bees, lost honey, and a setback that takes weeks to recover from. The good news: swarms rarely happen without warning. A simple decision framework, applied early, prevents most of them. This infographic walks through that framework step by step.
Start by Monitoring Hive Status
Every swarm prevention plan begins with observation. Two signals matter most: congestion and brood pressure. A hive that is filling its frames with bees, brood, and stores faster than the workers can keep up is a hive thinking about swarming. ApiaryPilot's status checks let you track both at a glance.
Key checks each visit: - Frame coverage and bee density across boxes - Capped and open brood pattern - Presence of drone brood (a precursor to swarm preparation) - Available empty comb for the queen to lay in
Is the Hive Congested?
This is the first branching decision. If the answer is yes, you're in a swarm watch state — typically when the colony is at 80% capacity or higher.
Congestion alert — add space immediately: - Add a honey super, or a second brood box - Rotate empty drawn comb into the brood nest - Confirm the queen still has room to lay
If you add supers and congestion eases, the colony stays productive. If it doesn't, escalate to the next step.
If the hive is not congested (around 60% capacity, in balance), continue active monitoring and check for queen cells anyway — early-season colonies sometimes prepare to swarm before they look full.
Still Congested? Look for Queen Cells
A congested hive that doesn't respond to added space is preparing to reproduce. Open the brood box and inspect frame edges and bottom bars carefully.
Action required: - Inspect every frame for queen cells (cups vs. charged cells with larvae and royal jelly) - Note location: bottom-bar cells often indicate true swarm cells; side cells can be supersedure - Treat charged swarm cells as a high priority signal
Found Queen Cells — Choose Your Response
Once charged swarm cells are present, you have two main paths:
1. Selective removal & mitigation — If cells are few and early, remove them carefully and re-inspect every 7 days. This buys time but rarely stops a fully committed colony on its own. Combine with added space and brood redistribution.
2. Splitting the hive — The most reliable way to satisfy the swarm impulse without losing bees. Move the queen and a few frames of brood and stores into a new box, leaving the original hive with the queen cells to raise a new queen. The colony "thinks" it has swarmed and settles down.
After a split, manage both colonies separately: monitor for mites, confirm the new queen mates successfully, and feed if a dearth follows.
The "No Queen Cells" Path: Stay Active
If the hive is balanced and you find no queen cells, the season's work continues:
- Seasonal progress — maximise yield during high nectar flow, monitor behaviour at the entrance
- Hive management — prepare for storage and maintenance as the flow ends
- Hive security — reduce the entrance and insulate ahead of cold weather
- Remote monitoring — use digital tools to keep an eye on weight, temperature, and activity between visits
- Colony care — ensure adequate winter stores and a stable cluster core around 32°C
Make Swarm Decisions a Habit
Most swarms are lost because the warning signs were visible at the previous inspection but weren't recorded or acted on. Logging congestion levels, queen cell counts, supering decisions, and split events in ApiaryPilot turns every visit into a data point — so when the colony starts whispering about swarming, you hear it early enough to respond.
Using this infographic
Keep it beside your inspection journal, print it for your club, or pin it in the honey room. Record the matching observations, treatments and follow-up tasks for each hive in ApiaryPilot.


