When to Harvest Honey: A Decision Flow for Beekeepers
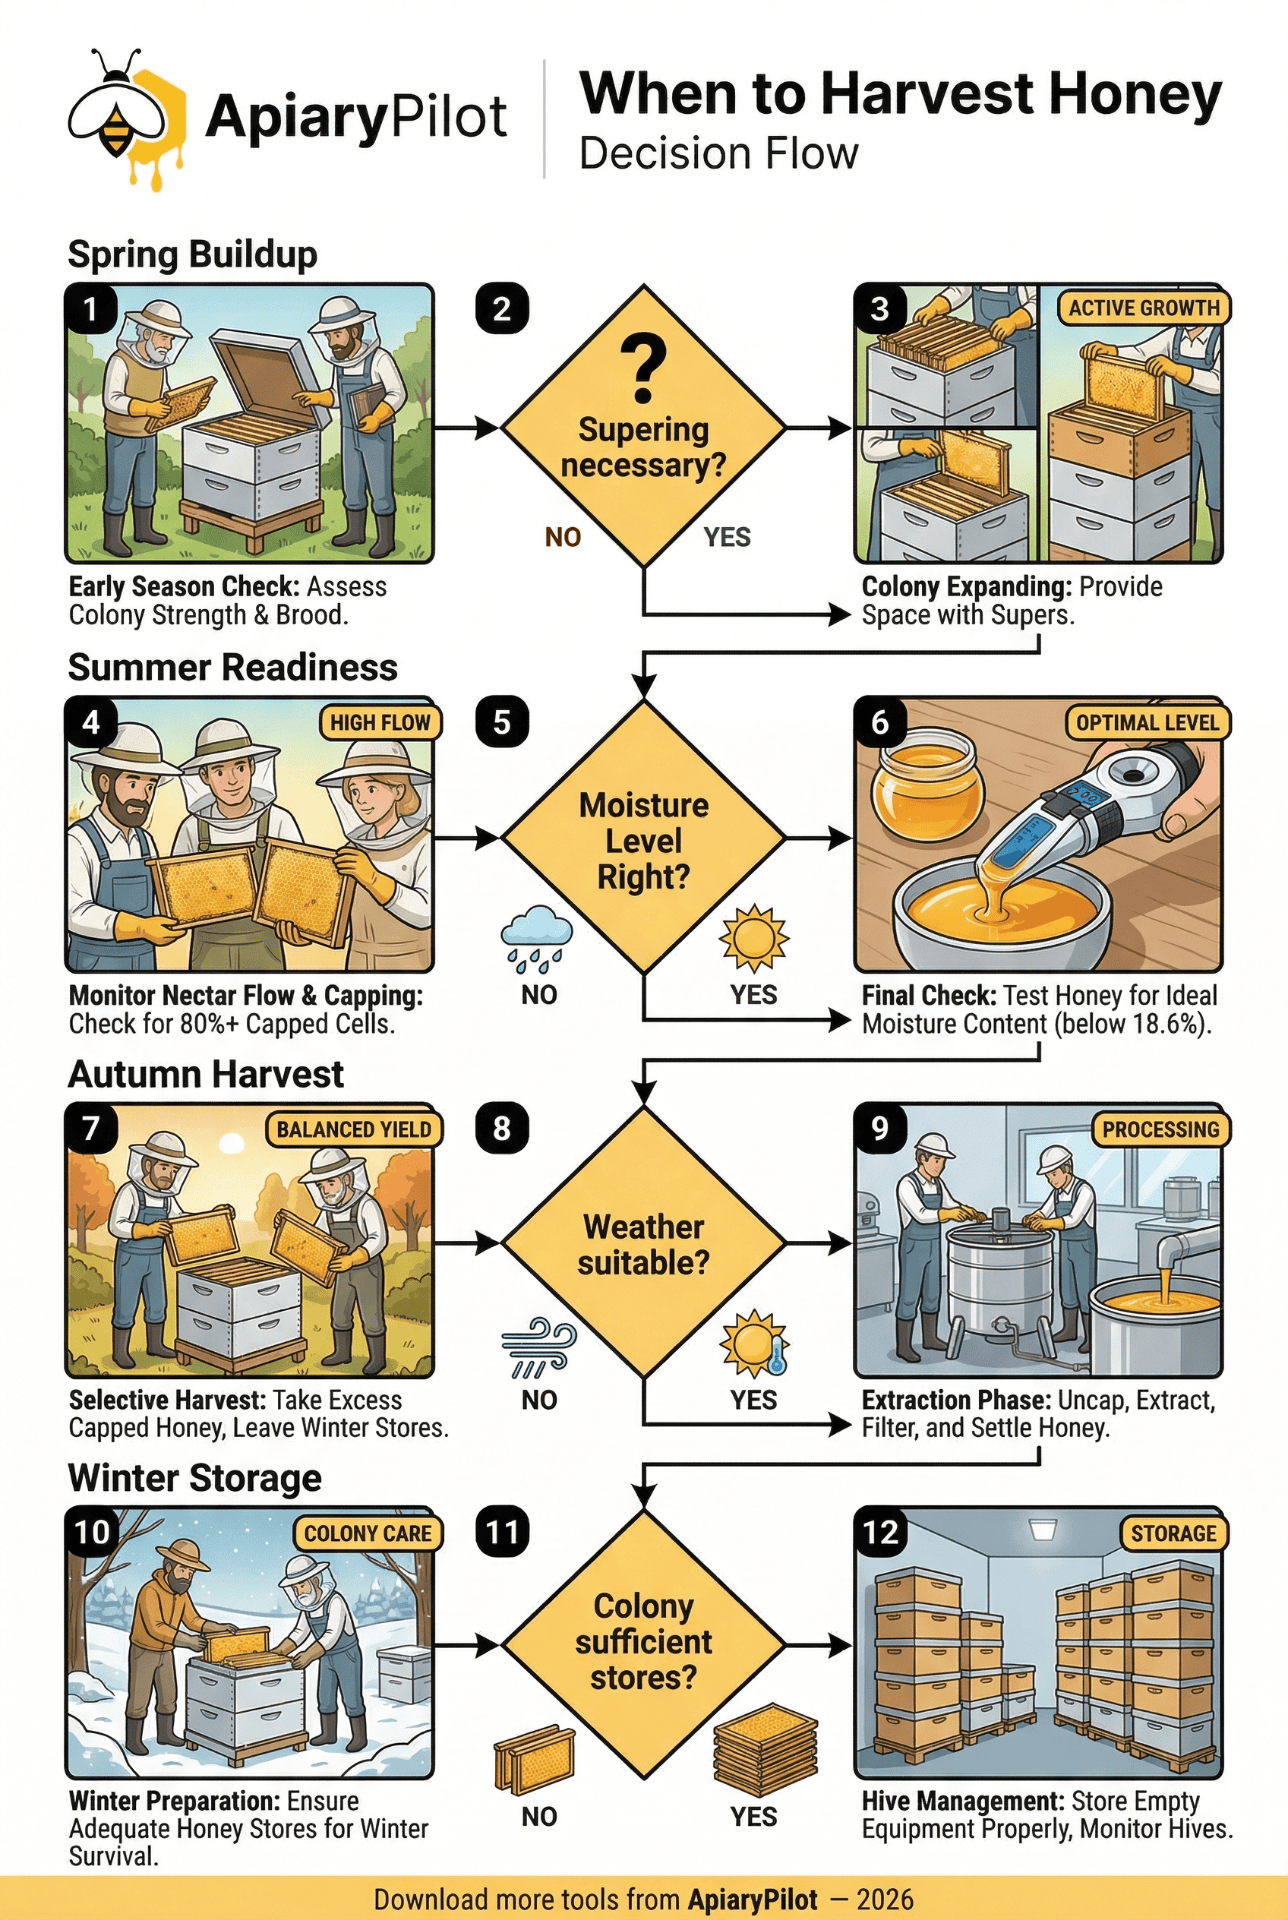
Not sure whether it is time to pull supers? This decision-flow infographic walks you through the four seasonal checkpoints — spring build-up, summer readiness, autumn harvest, and winter storage — with clear yes/no branches at every step.
About this when to harvest honey: a decision flow for beekeepers infographic
This beekeeping infographic turns the key decisions behind when to harvest honey: a decision flow for beekeepers into a visual reference that can be used during inspections, planning sessions, or training conversations. It is designed for practical apiary management, so each section highlights the observations, timing, and records that matter most in the field.
Use it as a quick reminder before opening colonies, preparing seasonal work, or reviewing hive notes with another beekeeper. For stronger records, keep the infographic beside your inspection journal and capture the matching hive data in ApiaryPilot, including dates, colony status, treatments, harvest actions, and follow-up tasks.
The download below is suitable for printing or sharing with a local beekeeping group. The embed code lets clubs, educators, and suppliers reference the infographic while linking back to the original ApiaryPilot guide page.
"When should I harvest?" is one of the most common questions new beekeepers ask, and the honest answer is: it depends on four things — colony strength, capping percentage, honey moisture, and the weather. This decision-flow infographic turns those variables into a clear checklist you can walk through before every extraction.
Stage 1: Spring Buildup
Step 1 — Early Season Check
Before you can harvest, the colony has to grow. On your first thorough spring inspection, assess colony strength and brood pattern. A colony covering fewer than six frames of bees, or one with a spotty brood pattern, is not a harvest candidate this season — it is a colony to nurture.
Step 2 — Supering Necessary?
No → the colony is small or slow-building; skip supering and revisit in two weeks. Yes → the brood chamber is filling and forage is available.
Step 3 — Colony Expanding: Provide Space
Add supers before the brood box is honey-bound. This is the most common early mistake: waiting too long, forcing the colony into swarm preparation, and losing half your workforce right before the main flow.
Stage 2: Summer Readiness
Step 4 — Monitor Nectar Flow & Capping
During the main flow, inspect every 10–14 days. The key metric is capping: you want frames that are at least 80 % capped before considering them ripe. Uncapped nectar is still too high in water content to store safely.
Step 5 — Moisture Level Right?
No → wet weather or an early inspection means moisture is still too high. Leave the super on and re-check in a week. Yes → cappings are extensive and the weather has been dry.
Step 6 — Final Check: Test Moisture
Use a refractometer to confirm honey moisture is below 18.6 %. Above that threshold, honey ferments in the jar. This single reading has ended more premature harvests than any other check — and saved more spoiled batches.

Stage 3: Autumn Harvest
Step 7 — Selective Harvest: Balanced Yield
Take excess capped honey and leave winter stores on the hive. In most temperate regions this means leaving 15–20 kg of honey per hive going into winter — more in colder or longer winters. Harvest is a partnership, not a raid.
Step 8 — Weather Suitable?
No → wind, rain, or robbing pressure; delay one to three days. Never pull supers into a robbing frenzy. Yes → dry, mild, and calm.
Step 9 — Extraction Phase
Uncap, extract, filter, and settle in a bee-tight room. Work quickly and keep everything covered — the smell of open honey travels for kilometres and can trigger apiary-wide robbing behaviour within hours.
Stage 4: Winter Storage
Step 10 — Winter Preparation: Colony Care
Confirm each hive has adequate honey stores centred over the cluster. Feed sugar syrup or fondant only if natural stores fall short. Complete Varroa treatment before the winter bees are raised — treated winter bees live for months, untreated ones do not.
Step 11 — Colony Sufficient Stores?
No → feed until target weight is reached; recheck weekly through late autumn. Yes → close up the hive with mouse guards, reduced entrances, and a windbreak if needed.
Step 12 — Hive Management: Storage
Store empty supers dry, wax-moth-protected, and clearly labelled by source hive. Monitor overwintering hives from the outside only — every unnecessary opening in winter costs the cluster energy it may not have to spare.
Turn the Flow into Habit
The value of a decision flow is that it makes the reasoning explicit: every "yes" and every "no" has a documented next action. In ApiaryPilot, you can log the capping percentage, moisture reading, weather note, and harvest weight against each hive on each date — so next year the decision flow is not just a poster on the wall, it is your own data telling you exactly when to pull supers.
Ready to elevate your beekeeping?
Start tracking your hives, inspections, and harvests with ApiaryPilot — the modern hive management platform built for beekeepers like you.
Get started free